TSP Service Manual
The TSP Service dialog runs a Time-Stamp Protocol (TSP) server using a selected TSP signing certificate and private key. You can optionally secure its listener with TLS.
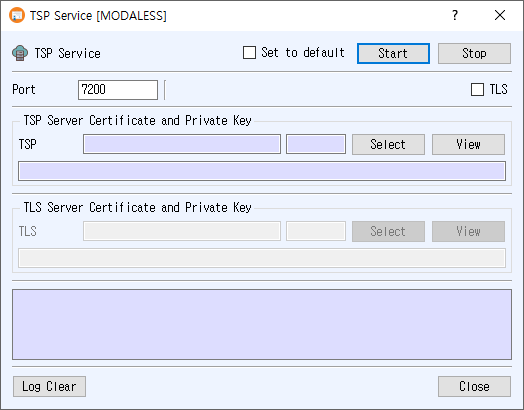
Open the dialog
Choose Service > TSP Service from the main window.
Configure the service
- Enter the listener Port.
- In TSP Server Certificate and Private Key, click Select and choose the certificate used to sign timestamp responses. The selected certificate number and name appear in the fields; use View to inspect it.
- To enable encrypted transport, check TLS. The TLS Server Certificate and Private Key section becomes available. Click its Select button to choose the TLS server certificate and associated private key. Use View to inspect the selected certificate.
- Optionally check Set to default to save these settings for the next time the dialog opens.
- Click Start. A successful start is indicated by the Start button turning green, and server messages appear in the log.
The TSP signing certificate is required. When TLS is enabled, a TLS certificate and private key are also required. The application reports an error if the port is empty, a selected record or key cannot be loaded, or the server cannot start. TLS certificates backed by PKCS#11 are not supported by this dialog.
Controls
- Stop stops the running TSP server.
- Log Clear clears the messages displayed in the log.
- Close closes the dialog.
- Set to default stores the listener port, TLS setting, and selected certificate numbers as the next-use defaults. Leaving it unchecked clears the saved default when the service starts.